It used to be that you could get Google apps for a personal domain free for up to 10 users. The lowest price for the current Google apps service is $5 per month per user. At that price, I’d say that the Google option is really only a consideration for businesses that are going to use Google products as a part of their workflow (as we do where I currently work). I wanted to be able to supply email addresses to my family, and I didn’t want to have to pay a lot just to do so.
After some digging, I found a solution that allows me to keep everything in Gmail, and is almost entirely cost-free. I’m using Mailgun, which is free for up to 10,000 emails (sent and received count the same towards this quota).
The first step is to create a Mailgun account, and go through the steps to verify your domain (by simply adding a few DNS records). I’m going to assume you’re savvy enough to get that done.
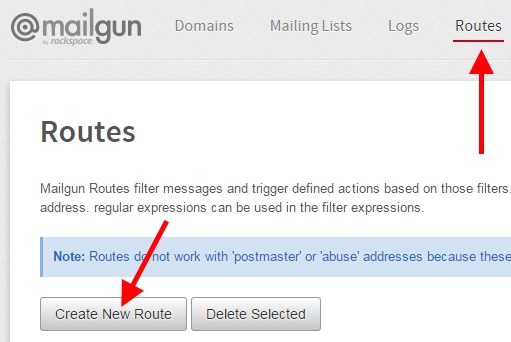
At this point, Mailgun is ready to be receive email at any arbitrary address at your custom domain. All it needs are some routes to know what to do with the mail that comes in.
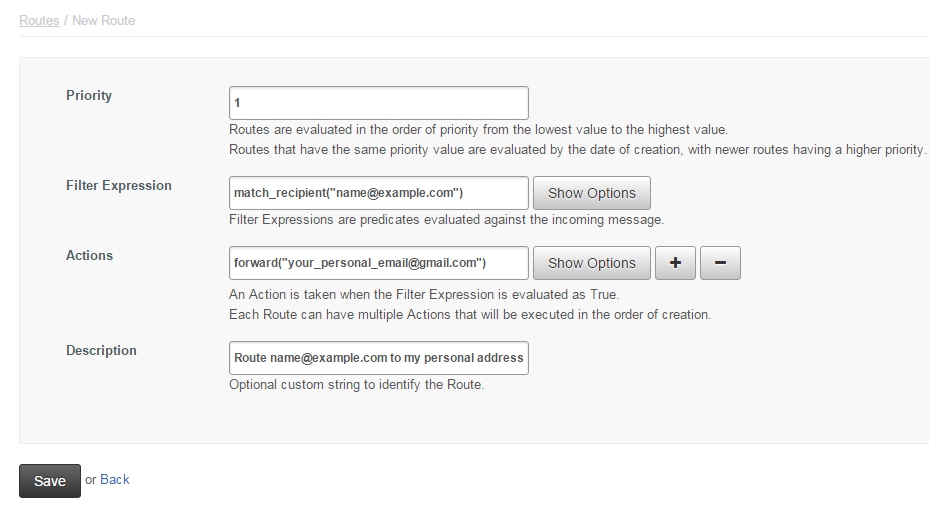
New routes look scarier than they are. The Show Options buttons will show you the valid options for each field. All you need to do is supply what goes in quotes. In the above example, the custom domain in question is example.com. This route will take any email that is sent to name@example.com, and forwards it directly to your_personal_email@gmail.com. The filter expression also accepts Regex, so you can create a catch-all route (e.g. ".*@example.com"), or get really creative. Any email sent to your domain that fails to get routed will bounce.
For sending mail, Mailgun offers an API, and SMTP. If you feel like writing your own email sending app using their API, knock yourself out. I chose to add a Send mail as account to my main personal Google account using SMTP. This is the only downside to this system that I can come up with - sending email requires a little bit more technical ability from each user, because it involves SMTP credentials.
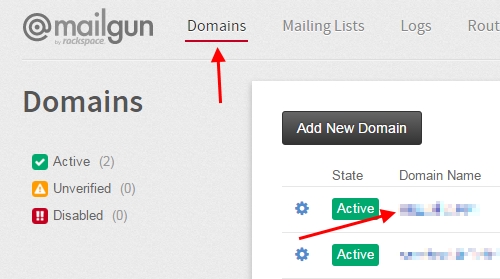
On your domain’s admin page on Mailgun (how to get there shown above), you will see that there is a default SMTP login and password. Next to that should be a clickable label that reads Manage SMTP credentials.

Here you can add any accounts that you want to be able to send as. In my case, I added one for me (john@domain.tld), and two more for my brothers. After that,
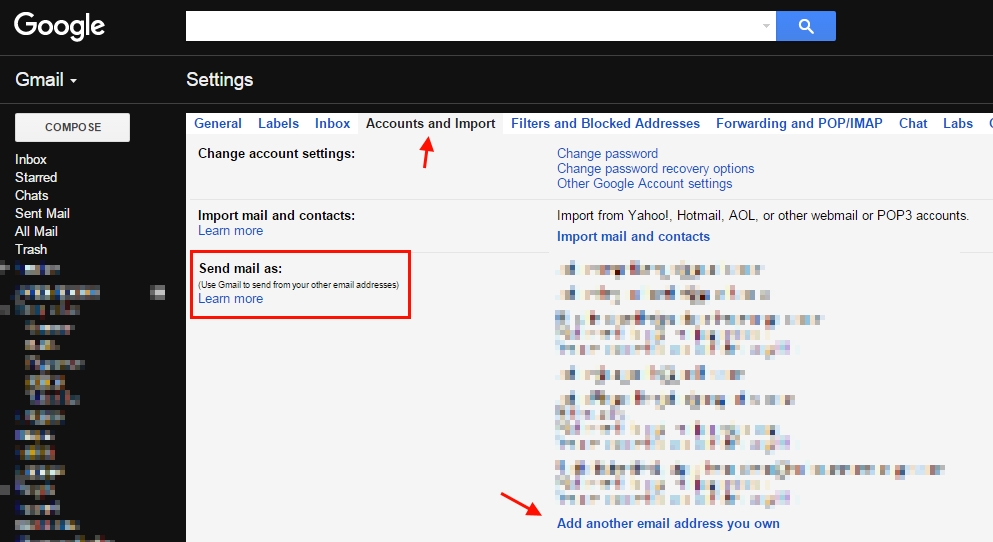
Once in gmail, follow Google’s instructions for sending from an external address here.
After that, you’re all set. I hope this was helpful.
John Hostile wrote this on April 1, 2016 /
Comments

I’ve been contacted a number of times about the 2014 full year calendar (a calendar I designed and recommended in 2013 for perspective and productivity. I still use mine, and I hope a few you out there also found it to be useful. If you’re interested, here is the calendar updated for 2014.
Go forth and conquer the world this year (and be sure to let me know about it)!
John Hostile wrote this on January 1, 2014 /
Comments
John Hostile wrote this on September 16, 2013 /
Comments
Recently on Google+ I wrote about a little Windows trick that makes sharing images from the web to social networks easier. It was a pretty popular post (by my standards), and it got me thinking about sharing images on my Android devices. Android has the power of intents (which I love to wield), and I thought I should be able to make image sharing from the web to other apps on Android a pretty simple thing.
So I did.
I called it “Web Image Share” because I’m an extremely gifted app namer. I know it’s only a small thing that helps share images from the web, but I’ve decided to release it here for anyone lovely enough to come and read these words. You’re a beautiful person, and you deserve it.
 This is the link to the Web Image Share APK.
The app is almost entirely intent-based, but it’s ok if you don’t know what that means. Share a URL of some kind to it (generally this will happen when sharing from a browser like Chrome, but apps like the Tumblr app and Imgur app also share out URLs, if I remember correctly). From there, you should be able to figure things out. It’s really pretty simple. I actually think it’s easier to share images on Android now than it is on any other OS. Intents are just that good.
If you can’t install APKs manually, or just prefer to get things from the Play Store directly, send me a message on Google+ and I’ll add you to the private beta community. I could be convinced to publish it publicly if people care that much, but for now I prefer to keep it private and not deal with 1-star reviews from users who aren’t familiar with intent-based apps.
If you end up trying it out, I hope you’ll let me know about it. I would appreciate it.
Side-note: I think releasing software, even if it’s not a big deal, is a better way to update a blog that hasn’t been updated in a while than apologizing for lack of content. I hope you’d agree.
John Hostile wrote this on July 17, 2013 /
Comments
###Introduction
I have a rich history with eating on the cheap. I’ve done the ramen thing, and I’ve explored lots of ways to get proper nutrition without having to scarf down my money supplies. I have little patience for spending large sums of money on simple day-to-day sustenance.
If you’re going to avoid eating away all your money without dying of malnutrition (or a heart attack), you have to face the reality that you’re going to have to prepare your own food. I like cooking, but I don’t always want to do it, and I don’t always want to spend a lot of time doing it. This has led me to look for ways to optimize what I do in the kitchen for day-to-day eating. I still sometimes cook up special meals that take more time, and I still eat out if the occasion calls for it.
###Hacker Foods: Part 1 of ?
That brings me to eggs. Eggs are packed with nutrition, and can serve as whole meals, or as quick snacks. A dozen should run you somewhere between $0.99 and $6.00. 3 eggs should feed an adult, so even at 6 bucks per dozen, we’re talking about $1.50 per meal. That’s still quite good, particularly considering the nutrition involved (I’d like to note here that I’m not advocating eating eggs exclusively).
I recommend making the world a better place and going for cage-free, or cage-free organic eggs. If you insist on getting the cheapest eggs possible, I’ll say this - I understand where you’re coming from, but I encourage you to re-examine your finances and be sure you’re picking your battles wisely.
I enjoy making omelets and scrambled eggs, but I often like to have food prepared in advance so that I can get right to hacking, or have a quick meal on-the-go. Hard boiled eggs struck me as a great food to have on-hand, but I needed a good method for making them. I asked food nerd friends for their methods, I looked to shows like “America’s Test Kitchen” and “Good Eats”, and of coursed I searched around on the net.
After a number of tests, I came up with a method I like. I present to you the easiest and most fool-proof method of cooking hard boiled eggs that I could come up with (I suppose I should call them “hard-cooked eggs”, considering the method).

-
Place a steamer basket into a pot. Any pot will do as long as the steamer basket fits inside of it. Any steamer basket will do as long as it has legs.
-
Fill the pot with hot water until the water is just below the basket. Sloshing the water, or tilting the pot will help determine when the water level is high enough.
-
Boil the water. This is one of the areas where this method shines. It doesn’t matter how long it takes for the water to boil, and you don’t have to watch it or time it. You can go do something else, and check on it occasionally. Many other methods have the eggs already in the water while you’re bringing it to a boil, which tethers you to the stovetop, lest you overcook your eggs. Furthermore, the reduced amount of water necessary for steaming means you’ll achieve a boil quicker.
-
Place the eggs in the steamer basket. There will be steam involved, so you should use tongs, or at least a couple of spoons, to place the eggs in the basket. If we had placed the steamer basket in the pot at this point instead of when heating, the water would cool off slightly and stop boiling. That could throw off the timing involved.
-
Cover the pot, and let the eggs steam. You can reduce the heat a bit at this point, as long as it maintains the boil. Set a timer for 10 minutes for fluffy yolks (go to 11 minutes if this isn’t cooked enough for you). I like to go with 9 minutes, as I prefer slightly more gelatinous yolks. Cooking with steam also means significantly fewer broken egg shells during the cooking process when compared to regular boiling.
-
When time is up, kill the heat and either fill the pot up with cold water, or transfer the eggs to cold water. I usually just fill with cold water, dump it out, and refill a few times (with a few seconds of hand stirring in between). If you don’t do this, you may end up with overcooked yolks with that green/brown color around them.
-
Eat now, or store them in the fridge and eat them within 5 days (I use an egg carton to store them). If you don’t like them cold, they warm up in the microwave very quickly. 15-30 seconds on high should be plenty to get them to room temperature or hotter.
Update: Microwaves vary in power. Be conservative if you aren’t sure if your particular microwave will blow up your particular eggs. Definitely try out 10 or 15 seconds first, and consider microwaving in intervals if you need more than that.
In addition to all the benefits already described above, steamed eggs are significantly easier to peel than the boiled kind, in my experience. Once you break open the membrane under the shell, it should all come off without much fuss.
The final step is to enjoy spending all the time and money you’ve saved. Happy hacking!
John Hostile wrote this on January 27, 2013 /
Comments